Are You a Model #DIGcit?

You’re at a conference and are introduced to a ton of new resources to use in your classroom.  You are so excited to share the resources with your teammates and anyone else who will listen! The evening is spent planning a super fun and engaging lesson that uses the latest app or website.  In the morning, you are all set and ready to get your students logged in and start using the resource.  However, there is one thing you forget to do.  As many of us have never done.  You didn’t check the Terms of Service of the resource to see how they use your student’s data.  I admit it, I’ve done this before.  I have used websites and apps without a second thought about my personal data or my students.  I need to make some swift changes and start being a better model of what a good digital citizen looks like to my colleagues and students.

Since I am starting a new position in the fall, I decided to start by reviewing 3 websites I know I’ll be using with my students.  FUSECodeCombat, and SketchUp for Schools .  The FUSE website is very straight forward.  It is an online STEM Lab and Makerspace curriculum housed at Northwestern University.  Users need to be 13 years or older, unless they have parent permission which is granted through the partnering school.  FUSE collects personal data such as name, gender, ethnicity, and birthdate. If a parent does not want that information collected, their child can set up an anonymous guest account.  This account however, does not keep track of the student’s progress.  Data collected is stored on a secure server.  Once your account is no longer active, FUSE will destroy any personal data related to you, but may keep information related to your progress or any demographic information, but your contact information will not be related to it.  I was actually not surprised by the information I found.  This is a reputable program geared towards middle school and high school users, I figured they would be compliant.  One thing I did find surprising was the Creative Commons Attribution-Share-Alike 4.0 license protecting the user’s content.  Under this license, any content submitted by a student allows other users to use and change that content as long as the original content is credited.  This is information I will need to share with my students as they begin creating.  I will definitely use the FUSE program in the fall.

CodeCombat is the second website that I investigated and is an open source coding program.  All personal data is stored behind a secure network with a limited number of persons who have access to it and abide by confidentiality.  The Terms of Service shared many different “Acts” that they comply to, many I’ve never heard of before.  SOPIPA, Fair Information Practices, CAN-SPAM Act, and General Data Protection Regulation for EU users to name a few.  The two that educators should be on the lookout for are COPPA ( Children’s Online Protection Privacy Act) and FERPA (Family Educational Rights and Privacy Act).  CodeCombat complies with both of these Acts which protect children’s data.  I again, was surprised by the Creative Commons Attribution license asking that any media or creative works used to create a level in the game be cited appropriately.  This website will be used with confidence this fall!

The final website I looked at was SketchUp for School.  This is a design site where you can create 3 dimensional designs that could later be 3D printed.  The language used in their Terms of Service, was difficult to read (very legal sounding).  It is required to use a third party login to obtain usage rights on the site.  The Terms of Service basically say that the third party is the one with any personal information so Trimble (home company) is not liable for any personal information of the user.  There is also a section that explains how Trimble owns any content created by the user.  They also state any comments, feedback, and any other data put on their site is their property and the user has no rights to it.   (It is all very legal sounding, so this is what I am interpreting it to say.)  Because of this last part, I am not sure I want my students using this site.  To me it sounds like my student’s intellectual property will be compromised and I am not willing to let that happen.  I am going to move forward by having our Tech Director take a look at these terms and see if I am misreading the information, I will update as soon as I get an answer back.

Our district has a committee that looks for COPPA and FERPA compliance on websites they know are being used by the classroom teachers.  But what about the websites or apps a teacher wants to use after hearing about it a conference or on Twitter?  Are educators aware that checking this information out is part of their responsibility?  Before I spend all night planning that fun and engaging lesson with a new resource, you can find me searching the bottom of the webpage looking for the Terms of Service and Privacy link.  Please consider doing the same!

Now that…is Positively Techie!

YOU are a Powerful Educator!

I have been working on a reflective project which has required me to think about the last 6 months of my professional career and the impact I have made in that time period.  With it being a new decade and all, my mind naturally started wandering to the year of 2010 and where I was professionally during that time.  I couldn’t help but think about how my professional life has changed in the past ten years.  If you were to ask me in 2010 where I saw myself in ten years, this is NOT the path I would have thought my journey would have taken me. 

So, It’s the year 2010.  I am 38 years old and have four children, ages 11, 9, 6, and 5.  I am a long term substitute in District 181 trying to get my “foot in the door” as I am needing to pack my Stay at Home Mom bags and go back to teaching full time.  Two years and 4 long term assignments later, I landed a full time teaching job.  Second grade at Madison School with an amazing team (whom I still love dearly today).  Getting back into the classroom was invigorating!  The excitement, the joy, the buzz I got from teaching!!  However, the year was challenging, not only professionally, but personally.  Juggling home life and a career was not easy.  Especially for someone like me who likes give 100% to anything I do.  Not having 200% to split equally between my family and career caused a lot of guilt and heartache.  It was something I knew I had to get a handle on if I was going to continue to be a successful teacher AND a stellar mom/wife. 

The next year I needed to make a move to either third grade or fifth grade because of a change in enrollment.  Never teaching anything higher than 3rd grade, I went totally out of my comfort zone and took the 5th grade position.  For the next five years, I taught 5th grade and LOVED every single minute of it, well, mostly.  In those five years, I grew and developed into an educator that I never dreamed I could become.  I started to realize and quite frankly, didn’t really like what I was noticing about our educational system.  I was quickly getting tired of all of the tests my 5th graders needed to take and I felt there should be more to school than paper and pencil activities.  Especially as we moved through the decade and technology was becoming more and more relevant in our world.  In 2013 I went back to school for Educational Technology and earned my Masters in 2015.  During those years I also made changes to my classroom, all fifth graders in 2014 had 1:1 iPads.  Talk about change!  I was thrilled!  Everything I was learning about in my Master’s classes, I could now actually put to use in my own classroom.  During that year and the few years later, my teaching  and classroom started changing to fit more closely with todays unique world.  I changed to a flexible classroom model, I started this blog, I facilitated a HUGE Shark Tank unit with all fifth graders , I had my students blogging, they were collaborating with architects, and other professionals, they convinced the Village to repair the roads around our school so they could ride their bikes more safely.  My students were learning real world skills by tackling real world problems.  In the thick of it all, each little story of impact didn’t mean much at all.  It was just little old me, mom of four, trying to give my students the educational experience I felt they needed.

Fast forward to 2017, I applied for and became an Apple Distinguished Educator!  Excitement overload!  Again, who would have thought back in 2010 that this stay at home mom, would achieve being recognized by Apple as an innovative educator?  That same year I moved into the library as my love for teaching in the classroom was dwindling each year.  As much as I wanted to “disrupt” the system, I still had rules to follow and curriculum to teach.  More and more time was being taken away by mandatory lessons and tests, less and less time was available to do the activities I felt were most important.  Moving to the library as the Teacher Librarian and weCreate Lab Facilitator (STEAM Lab) allowed me to give ALL of the students a place to tackle those real world problems and learn skills they’ll need for their future.

It seemed like the right fit for me – again, I never saw it coming.  The past three years have included a lot of planning, implementation, and reflecting only to go through the cycle again and again.  As our world is ever changing, I need to change, the space where I “teach” needs to change, my mindset needs to change. 

A new year is a great time to reflect, but a new decade is even better.  So many times we forget the little, tiny impacts we make each year, we never really take the time to see how all of those tiny, little stories of impact add up to the powerful changes you are making in your classroom, school, or district.  I challenge you to add up your stories of impact from the last decade so you can see how powerful you really are!  I’d love to hear all about them in the comments below!

Now that….is Positively Techie!

IMG_3846

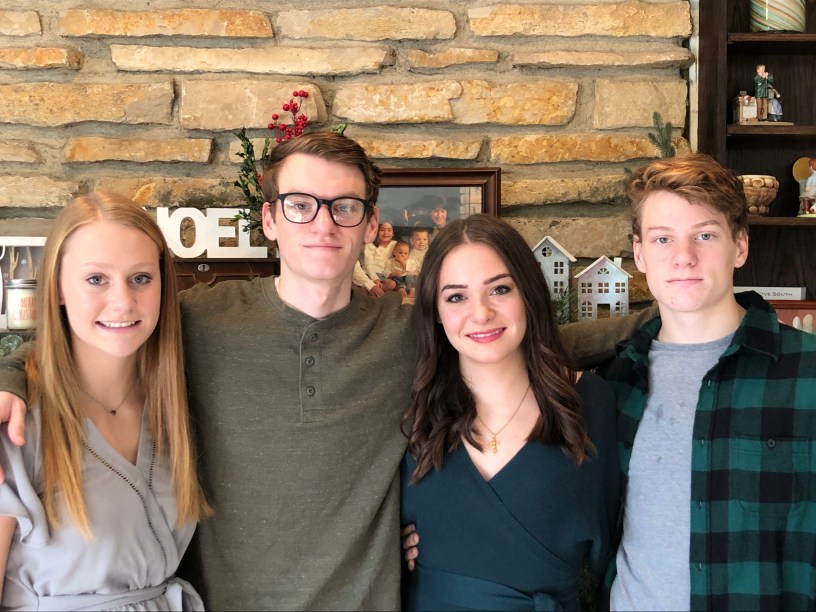
2020 – Josie 16, Frankie 19, Toni 21, Joey 15

A Few of My Favorite #ISTE18 Things

My eyes start to soak in the scene in front of me.  A lobby FILLED with people walking in all different directions, some chatting with colleagues, some looking down at a device, others standing and looking around trying to figure out where to go.  A smile reaches across my face, my nose scrunches up, my heart starts to beat a little faster and a tiny giggle secretly bellows in my belly.  I want to let out a little scream… My first ISTE Conference and I can’t wait to share a few of my favorite sessions!

Fostering Creativity through Visual Storytelling with Keynote delivered by fellow ADE’s Wes Molyneaux @WesMolyneaux and Ben Mountz @BenMountz
This session on using Keynote for storytelling was awesome! Not only did you get to use a new iPad with Apple Pencil, you also had many ADEs around to help you if you got stuck.  Participants were led through a series of activities to try on the iPad.  We were able to choose from all of the new shapes and manipulate the size, color, and direction of the shape.  We also got rid of the unwanted background in photos using instant alpha, animated the shapes and photos using magic move and my favorite, using the drawing tool and animating the drawing.  (I will be posting about another Apple session and share some fun ideas that I will be trying for the beginning of the school year, so come back soon!) Everyone Can Create Curriculum
My takeaway from the session: You can use Keynote to tell a variety of different stories using animation, audio, video, drawing and more ALL created IN Keynote.  Oh, and a big game changer, you can export your keynote creation AS A MOVIE!!


One STEM Chicago: Building a Digital STEM Community delivered by Michael Kosko @mrkosko
This presentation highlighted the program developed at CPS “One STEM Chicago” which uses the hashtag #cpsSTEM to help build communication, collaboration, and showcase all of the wonderful things students and teachers are doing in the classroom.  Three times last school year, teachers were asked to participate in a STEM related challenge/activity.  If a teacher was interested in participating, they filled out a Google form providing information such as school, grade level, and most importantly, a time that is good for the class to Skype or Google Hangout with another classroom.  Within a specific timeline in the fall, classrooms set time aside during recess, choice time, or whenever the teacher could find about 30 – 60 minutes in the schedule to let the students create a film canister rocket.  As the students create their rockets, they document EVERYTHING; steps in creation process, photos and videos, data collected from the rocket taking off, changes they had to make after testing, etc.  Students also spent time watching a video of an actual rocket scientist who shared information about rockets.  The last part of the activity was the time to Skype with the other classroom.  During this visit, students shared their creations, answered specific questions, and had meaningful conversations around the topic of the rocket building.  This whole process happened two more times throughout the school year with different STEM challenges.
My takeaway: This is definitely something I am going to try and duplicate within my district.  I think it will help build community around the topic of STEM which is needed right now.

#BookSnaps: Snapchat for Annotation and Digital Visualization delivered by creator Tara Martin @TaraMartinEdu
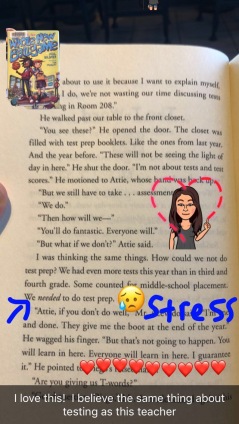
If you are looking for a way to get your students excited about sharing their thoughts on what they are reading, then you should give #BookSnaps a try!  Basically, you take a picture of a page in a book you are reading and annotate it “Snapchat” style. There are only two rules, include the title of the book and the author in your snap.  That is it, the rest is up to your student’s creativity.  Students can make #MathSnaps out of math problems, #Historysnaps, or #Sciencesnaps.   Whatever subject you teach, you can use this idea! My favorite #snap for the beginning of the year: #REALyouSnaps where the student takes a selfie and adds emojis, stickers, words, etc. showing who they are.  You can put them all together in the Clips app to make a movie and have it playing during Open House Night at the beginning of the year.
My takeaway: Tara’s story of how #BookSnaps became a huge sensation really hit home for me as her story is a perfect real life example of the message I share with my students ALL THE TIME.  Don’t be afraid to take risks, share your ideas with the world beacause your voice matters and you never know who will be listening.

IMG_0786

I “heard” the same message over and over at ISTE, and I am so glad I did.  This message is what I try to do each day as I work with students in our weCreate Lab and it makes me smile, scrunch up my nose, and giggle secretly to myself: The job of a teacher is to help students become curators of ideas, creators, change makers, and global partners.

Now that… is Positively Techie!

Is the weCreate Lab Creating “Better” Students?

Three years ago, my principal asked our staff to think of something BIG that our PTO can fund.  Since I already acquired flexible seating and 1:1 iPads for 5th grade through the PTO, I needed to find something else that I was passionate about and that I knew the PTO could help me bring to life.  Over the next two years I slowly integrated using STEAM materials (purchased by the PTO) into my classroom and during an after school club for all 1st – 5th grade students at our school.  Finally this year, our school opened the first STEAM Lab in the District.  This video is a snapshot of what it looks like. 

The popularity of the lab is growing and now the District is working on a plan to guide in the opening of STEAM Labs in all of the other 6 elementary schools. We host tours for not only our fellow district members, but other districts have come for visits to see how they can implement a STEAM Lab in their buildings as well. 

The true success of this story is not the fact that this is the first in our district or that others want to follow suit.  The real success is seeing the growth of my students from the first day they stepped foot into the lab to now. It is amazing how quickly the students are changing right before my eyes.  I can’t even imagine how much influence this lab will have on the students who are in kindergarten and will have the opportunity to participate in the lab until they “graduate” from 5th grade.  Will they be better prepared for what future jobs hold for them?  Will they be better problem solvers and critical thinkers?  Will they be more flexible and self directed?   Will they be more willing to take risks and fail?  Will more girls become interested in a STEM career path?  

One can only guess what the the future holds. Our job as educators is to prepare students for that unknown.  We can never lose sight that the reason we do what we do, is for the students.  We need to keep dreaming BIG and find ways to make those dreams happen.  If we don’t do it, who will?

Now that …is Positively Techie!

Making Changes as an Apple Distinguished Educator

April 3,2017. The lunch bell rings and my students hurry to their lockers to grab their lunches and head to the lunch room. Some of the girls are hanging back because we are eating together today. I grab my phone and quickly check emails before heading down to grab my lunch. I stand there, shocked, tears start welling up in my eyes. One of my students notices and asks me, “Mrs. Gadzala, what is wrong?”. I reply, “Nothing is wrong, I can’t believe it! Remember our video for Apple? I got it!!”. The girls hug me and congratulate me. As I head down to grab my lunch, I am numb with disbelief. I will never forget that moment.

Apple Academy, Class of 2017 (Best class ever 😉) what an honor to spend meaningful time to collaborate, learn, share, and connect with this group of talented and innovative educators. The connections I made and stories I heard confirmed for me that we have a long way to go in education to get us moving forward. Here we are, The Class of 2017 and all the alumni before us, leading the way by being advocates, authors, ambassadors, and advisors. The group is growing, yet there are still so many educators resistant to the change that needs to take place in our classrooms. I am excited to be in a new position this school year that will allow me to focus on creating that change in many classrooms. I am going to start with my own, which is the library.

This fall I will be the new MRC Director and the facilitator of our new weCreate Studio. This new role will allow me to change the purpose of the library and the role in which I play. The library will be the new hub of the school community. It will be a space not only for students to come and check out books, but a place where THEY can be advocates, authors, ambassadors, and advisors with their peers. As I lead the way with my students, I will also be traveling through my journey with the staff and hopefully gaining passengers along the way.

The Academy gave me the tools, like minded peers, and inspiration to follow my heart and passion for what I believe is necessary in education today. Thank you Apple Education Team for believing in me and giving me the BEST 4 days of professional development I have ever experienced!

Now that…Is Positively Techie!

Memory Lane Takes on Technology

For me, taking a stroll down Memory Lane means digging through boxes of old photos.  Determining the date the photo was taken is easy as most of them have the date printed on the white border around the picture.  The coloring of the photos are  a bit off, some photos are bent, others have a sticky backside from being pulled out of an album.  Then I have my own children’s photos to stroll through.  My first born’s photos are similar to mine being in boxes or albums, the color and clarity much richer than the old photos from the 70’s.  But when I search for my third born’s photos, well that is a whole new story.  Her photos are all on my computer.  All digital.  Instead of being piles in a box, her photos are “piles” of digital photos in a folder on my desktop.  Some are organized by dated folders, but not many – that is a job for another day.  Realizing that this is how most people store their photos, I wanted to teach my students a way they could bring their memories to life.

This is the third year we are creating a digital memory book.  Each year, it gets better and better!  This project takes about 5 months to complete and a lot of the work happens at home, on the student’s own time.  By the end of fifth grade, our students will have a digital memory book that spans from birth to the end of fifth grade.  It is a keepsake that I think most parents will treasure for many years to come.

Each month, students are assigned a specific time period of their life.  They are asked to come to class by a specific date with photos from that time period on their iPads.  This letter is sent home each month to parents to make sure students are prepared on the date we have set aside to work on the books.  Along with the letter is the organization sheet the students fill out for each photo selected.

The first step is to create a title page for the first time period “birth to preschool”.  Students use Keynote to create this page and can include photos if they choose.  Once the slide is created, they screen shot it and then drop it into iMovie along with all of their photos from those early years.  The next step is to create music to be played during the title page.  Using Garageband, students can compose their own music or record themselves playing an instrument.  I tell them to think of the memory they are going to tell about and have the music reflect the mood and tone of that memory.  The last step is to write about a single memory from that time period using their knowledge from our recent memoir unit in writing.  Students record themselves reading their memory in iMovie.  This is great way for students to practice their fluency 🙂

Each time period should last about a minute with the whole memory book lasting about 7 minutes long.  When “books” are completed, we have a gallery walk and allow time for others to view the books.  The final step is transferring the memory books onto a flash drive for the students to take home and be able to treasure their elementary years for many years to come.

Now that…Is Positively Techie !


Apple PD…Easy as 1, 2, 3!

Anyone who knows me, knows I absolutely LOVE Apple products.  I wasn’t always an Apple girl. It all started when I returned to the classroom several years ago.  I had no choice but to use a Mac because that is what our school district used.  All of my computer experience consisted of Microsoft, so it took a while to get used to Pages, Numbers, and Keynote.  However once I did, I would never look back!  In the past 9 years that I have been back to work, Apple has developed amazing products to enhance student productivity and creativity.  They also display a strong commitment to education and supporting students and teachers.  Now, there is even MORE of a reason to love Apple, The Apple Teacher Program.

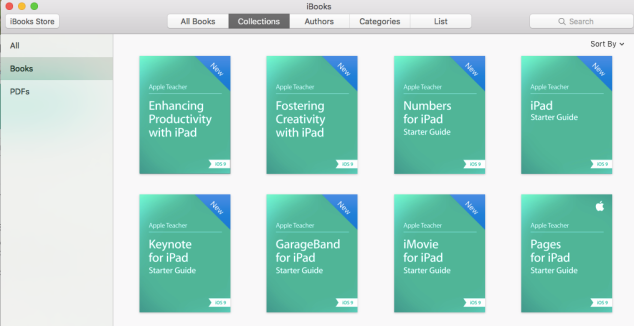
The Apple Teacher Program  is a program that helps teachers get the most out of Apple products.  Once you sign up with your Apple ID, you have a multitude of resources available to you.  The resources I found the most helpful are the iBooks dedicated to each Apple app.  There is an iBook for each productivity app as well as creative app for both iPad and Mac.

screen-shot-2016-11-13-at-8-58-57-am

What I love about this is you can learn about these products/apps at your own pace.  You can skip over what you already know, re-read what is confusing, or take it one skill at a time.  All while in the comfort of your own home.  After you’ve mastered each product/app , you can take a quick 5 question quiz to earn badges.  Once you pass all 8 quizzes, you get the Apple Teacher 2016 badge that you can proudly display.  Not only are there “Starter Guides” for the above Apple products, there are  many other iBooks that have been written for educators to help YOU learn tips and tricks for other apps you could use in your classroom.

Another amazing FREE PD Apple offers teachers is “First Tuesdays for Teachers“.

screen-shot-2016-11-13-at-9-10-43-am

In select areas, Apple stores offer PD on their apps and products, the first Tuesday of every month.  I attended my first one on November 1st, and it covered Keynote.  A Creative Team member from the Apple Store lead the session.  There were about 10 other educators there and the session lasted for and hour and a half.  The session was hands on and was very informative.  I highly recommend searching for a store near you and registering today!

One of our goals as educators is to inspire our students to become life long learners.  I strongly believe that leading by example is very powerful.  It is easy to get bogged down with school work and home life, but we need to take the time to grow as educators.  We need to take the time to learn new things.  We need to take the time to be a good role model to our students and show them that WE TOO are life long learners.

Now that…Is Positively Techie!


Putting MORE FLEX in Your Flexible Classroom!

It almost seems like the place is deserted….the floors are extra shiny, random pieces of furniture are stacked up in small piles here and there, the lockers are clean and empty.  However, you walk down the hall a little further and peek inside one of the classrooms and teachers inside are frantically setting up their rooms… creating cute bulletin board displays, hanging posters, placing books onto bookshelves, carefully writing student names on name plates,  arranging furniture, cutting out laminated letters, and admiring their new Flair pens 😉

This is one of my favorite times of year.  I LOVE the beginning of the school year.  I LOVE the anticipation of meeting my new students.   I LOVE setting up my classroom.  My home away from home.  The place that will become my new student’s home away from home.   I spent ALL summer thinking about the changes I wanted to make after living a full year in a flexible classroom space.   There  were so many positive things  that occured, but there are a few major changes that I am making this year in hopes to make my flexible classroom even better than last year!

  • No Teacher Desk/ Add More Furniture
    Our generous PTO awarded the 5th Grade Team with money to purchase more flexible furniture, I needed to make space because my dream was to have a couch :))  I chose to “ditch my desk” to gain that space for the couch.  I am lucky enough to have a wall of cabinets and I am not the “pack-rat” type, so I had plenty of open space to store my things in the drawers and cabinets along the wall.  I also feel I will be more connected with the students because I will always have to sit in their spaces with them.  It truly will be OUR space.  I also got some Ergo Stools and a dry erase table which I adjusted to standing height.
  • Create Specific Zones
    Last year I allowed the students to move ALL the furniture anywhere, anytime.  This year students will only be able to change their seat options.  I have developed specific “zones” that will remain in place all school year:

    • Whole Group/Class Meeting
    • Standing
    • Floor Sitting
    • Table Sitting
    • Quiet Area – I don’t want to be bothered
    • Guided Reading/Math – work with teacher in small group
    • weCreate Corner / Reading / I’m done with my work
  • Designate Number of Students per Zone
    I will be designated a specific number of students who can sit in each zone.

I am really excited to try my new ideas out this school year and as with anything I will constantly reflect and make changes along the way as needed!

Now that…Is Positively Techie!

I am super excited to introduce my guest writer, Bethany Martino :))  Bethany teaches 1st Grade at Madison School and started her journey implementing a Flexible Classroom last year too.  Since I teach 5th grade, I asked Bethany to share  her experience as a primary teacher so you can gain the primary perspective as well!  

I am a person who is always looking for ways to freshen up my teaching and my classroom.  I was tired of how my classroom was set up– with desks in pods and all students sitting in little blue chairs that have to be uncomfortable. (I certainly wouldn’t want to sit in them all day long.) I knew something had to change.  I had heard about flexible classrooms but I had never seen one in person or knew a teacher who had transformed her classroom. I was also a little worried about how it would work in a first grade classroom with little bodies that are already active, easily distracted, and excited about everything . This could either be a complete disaster or an absolutely wonderful thing for my classroom and students. I crossed my fingers and made a plan.

Luckily, I work with some amazingly supportive colleagues who helped me turn this dream into a reality. I was able to get everything I needed from exploring our school basement and claiming unwanted items and our extremely generous PTO.

In my classroom, I have different options for workspaces and chairs. Students are able to select their ideal workspace as well as the chair that helps them focus and do their best work.

To begin transforming our classroom, the students and I talked about what would be changing and how we would use the new materials appropriately. The students were beyond thrilled and couldn’t wait to start using everything. When everything arrived, we used time to explore the new chairs.

I knew I couldn’t let first graders have free reign over the furniture or it would be complete chaos (and there would probably be a lot of arguments) so I gave the students some choice while I also was able to control it to an extent. We used Kahoot (an online quiz and survey website) to take a survey on our workspace and seating preferences. The students ranked the different options from 1-4 with 1 being their most preferred option. They did this for workspaces and seating. (To be honest, this process took longer than expected the first few times but the students picked up the process quickly and it became much more efficient each time we did it.) I took the results and assigned students a workspace (based on their preferences) and then a chair. In most cases, I was able to give each student their first or second choice. We continued to do this every two weeks so students could experience all of the different workspaces and chairs. I was impressed by how well my students were able to choose what worked best for them. They were all willing to give the different options a try and most found their favorites quickly. I found most students were able to focus on their work and finish it in the allotted time. This wasn’t always the case in past years. Most were able to start working right away. This wasn’t always the case in past years. The students also became aware of how they learn and work best. This wasn’t the case in past years.

As a teacher, I am so glad I made the switch. I feel like I am better able to meet my students’ needs. I’m a more flexible teacher because things are always changing in our classroom and we are able to move furniture and adapt to what is needed in our classroom for any given project or lesson. This is a switch that I am glad I made. I can’t imagine teaching in a traditional classroom again. If you’re on the fence about changing your classroom, do it. You won’t regret it and your students will LOVE it!
~Bethany Martino

Summer Learning Part 3: Circuit Design

The last hour of a 4 hour summer school day was Circuit Design.  I knew I needed to make this class fun, educational, and challenging to win my students attention.  I had again, acquired several STEM materials from our generous PTO.  I had Snap Circuits, LittleBits, and Makey Makey kits to use in the next three weeks.  It only seemed natural to dedicate a week to each kit.  Below you can see the break down of what I did each day…

Day 1-2 Discuss Electricity

Day 3-5
  • Students work in groups to explore Snap Circuits
    • Start with no directions (used mini kits)
    • Give student guide with experiments to choose from
Day 6
  • Students work in partners to explore LittleBits
    • Start with no directions – let students discover how things work
    • Give task cards to use
Day 7-8
  • Partners develop idea
    • Brainstorm ideas of something to make that will solve an everyday problem
    • Draw a model of idea
    • Make a list of materials needed
Day 9-10
  • Use LittleBits to create a prototype of idea
Day 11
  • Share prototype
  • Make positive comments on paper
Day 12-13
  • Play around with Makey Makey
Day 14-15
  • Play Breakout Edu

As you can see, I started off the three weeks discussing and discovering what electricity is and how it works.  My favorite part of the three weeks was the week we used LittleBits.  I gave partners the challenge to design a prototype of something that would solve a problem thy encounter.  With limited supplies and LittleBits, the students amazed me…

One student made a night light/fan for her little brother, other partnerships created a mosquito repellent hat, a disco light, and a bubble maker.  When students shared their prototypes, the audience wrote positive notes on post-its for each other to read.

The last two days I tried out something new and well,  SUPER exciting :))  I recently received the Breakout EDU  kits for our school and could NOT wait until the Fall to try it out with students.  So, I gave it a try with my Circuit Design class and WE ALL LOVED IT!!!

Breakout EDU is  a game where students need to work together to solve clues in order to unlock locks.  When all locks are unlocked within a certain time, the box can be opened and you win!  Games are based on all types of curricular areas and teachers and students can even create their own games using the template provided by the company.  If you have never heard of Breakout EDU or have but wasn’t sure if you should get it, I highly recommend that you do purchase it for your classroom/school.

The beginning of this summer was filled with learning not only for my students, but for me as well.  I am now filling my days reading the Launch Book by AJ Juliani and John Spencer, preparing for two presentations on Flexible Learning Spaces and the Shark Tank project I did with my class this year.  I am also finding the time to relax, spend time with my family and friends, and reflect on changes for the upcoming year.

How are you spending your final days of summer?

Now that…is Positively Techie !

Summer Learning Part 2: Coding with Ozobot Robots

This year our PTO purchased a set of ozobot robots as part of our new weCreate Studio.  I used ozobots in my Innovation Club and couldn’t wait to have the opportunity to have fifteen hours dedicated to using them :))  So, the next part of my day in summer school consisted of two coding classes.  I had a class with students entering 1st grade through 3rd grade and another class with students entering 4th grade through 6th grade.  Both classes had 18 students enrolled as I had 18 ozobots available.

Ozobots are mini robots that follow code from a variety of sources.  I love using ozobots because of their flexibility and differentiated approach to teach coding to students.  With ozobots, you begin by drawing a line on paper and watch the ozobot follow the line.  The next step is to add color codes to the line.  The ozobot reads the code and then follows that code.  Finally, the user logs into ozoblockly.com to write block codes for the ozobot to read.  Within the ozoblockly site, there are several different levels the user can utilize from beginner to advanced.

I used lessons from the ozobot website to guide my instruction.  My goal for the end of the session was to have the students create a maze and then write the code for the ozobot to complete the maze.  Below you can see the schedule I followed.

1st – 3rd Grade

4th – 7th Grade

Day 1 Explore the ozobot Explore the ozobot
Day 2-3 Basic Training Lesson 1 Basic Training Lesson 1
Day 4 Workshop 1 Basic Training Lesson 2
Day 5 Workshop 2 Basic Training Lesson 2 cont.
Day 6 Free Play with ozobot app AND “Draw coding” Free Play with ozobot app
Day 7-10 Ozoblockly Basic Training Lessons Ozoblockly Basic Training Lessons
Day 11 Deasign and draw maze Design and draw maze
Day 12-13 Finalize maze that ozobot can fit through Build maze
Day 14-15 Write the code for maze Write the code for maze


The ozobot website has so many resources that makes using this tool so incredibly easy, even if you have never coded before.  I highly recommend including ozobots in your Stem lab or classroom.  If funds are low, you can always try creating a project on DonorsChoose.org or even check your local library, they might have a set you can check out!

Now that…Is Positively Techie !

How do you use ozobots in your classroom?  I’d love to know!

Summer Learning Part 1: Stop Motion Animation