A Few of My Favorite #ISTE18 Things

My eyes start to soak in the scene in front of me.  A lobby FILLED with people walking in all different directions, some chatting with colleagues, some looking down at a device, others standing and looking around trying to figure out where to go.  A smile reaches across my face, my nose scrunches up, my heart starts to beat a little faster and a tiny giggle secretly bellows in my belly.  I want to let out a little scream… My first ISTE Conference and I can’t wait to share a few of my favorite sessions!

Fostering Creativity through Visual Storytelling with Keynote delivered by fellow ADE’s Wes Molyneaux @WesMolyneaux and Ben Mountz @BenMountz
This session on using Keynote for storytelling was awesome! Not only did you get to use a new iPad with Apple Pencil, you also had many ADEs around to help you if you got stuck.  Participants were led through a series of activities to try on the iPad.  We were able to choose from all of the new shapes and manipulate the size, color, and direction of the shape.  We also got rid of the unwanted background in photos using instant alpha, animated the shapes and photos using magic move and my favorite, using the drawing tool and animating the drawing.  (I will be posting about another Apple session and share some fun ideas that I will be trying for the beginning of the school year, so come back soon!) Everyone Can Create Curriculum
My takeaway from the session: You can use Keynote to tell a variety of different stories using animation, audio, video, drawing and more ALL created IN Keynote.  Oh, and a big game changer, you can export your keynote creation AS A MOVIE!!


One STEM Chicago: Building a Digital STEM Community delivered by Michael Kosko @mrkosko
This presentation highlighted the program developed at CPS “One STEM Chicago” which uses the hashtag #cpsSTEM to help build communication, collaboration, and showcase all of the wonderful things students and teachers are doing in the classroom.  Three times last school year, teachers were asked to participate in a STEM related challenge/activity.  If a teacher was interested in participating, they filled out a Google form providing information such as school, grade level, and most importantly, a time that is good for the class to Skype or Google Hangout with another classroom.  Within a specific timeline in the fall, classrooms set time aside during recess, choice time, or whenever the teacher could find about 30 – 60 minutes in the schedule to let the students create a film canister rocket.  As the students create their rockets, they document EVERYTHING; steps in creation process, photos and videos, data collected from the rocket taking off, changes they had to make after testing, etc.  Students also spent time watching a video of an actual rocket scientist who shared information about rockets.  The last part of the activity was the time to Skype with the other classroom.  During this visit, students shared their creations, answered specific questions, and had meaningful conversations around the topic of the rocket building.  This whole process happened two more times throughout the school year with different STEM challenges.
My takeaway: This is definitely something I am going to try and duplicate within my district.  I think it will help build community around the topic of STEM which is needed right now.

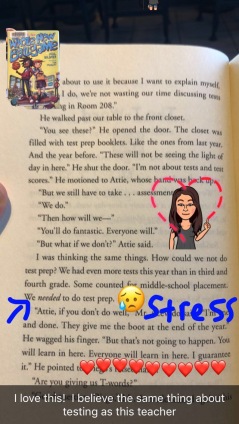
#BookSnaps: Snapchat for Annotation and Digital Visualization delivered by creator Tara Martin @TaraMartinEdu
If you are looking for a way to get your students excited about sharing their thoughts on what they are reading, then you should give #BookSnaps a try!  Basically, you take a picture of a page in a book you are reading and annotate it “Snapchat” style. There are only two rules, include the title of the book and the author in your snap.  That is it, the rest is up to your student’s creativity.  Students can make #MathSnaps out of math problems, #Historysnaps, or #Sciencesnaps.   Whatever subject you teach, you can use this idea! My favorite #snap for the beginning of the year: #REALyouSnaps where the student takes a selfie and adds emojis, stickers, words, etc. showing who they are.  You can put them all together in the Clips app to make a movie and have it playing during Open House Night at the beginning of the year.
My takeaway: Tara’s story of how #BookSnaps became a huge sensation really hit home for me as her story is a perfect real life example of the message I share with my students ALL THE TIME.  Don’t be afraid to take risks, share your ideas with the world beacause your voice matters and you never know who will be listening.

IMG_0786

I “heard” the same message over and over at ISTE, and I am so glad I did.  This message is what I try to do each day as I work with students in our weCreate Lab and it makes me smile, scrunch up my nose, and giggle secretly to myself: The job of a teacher is to help students become curators of ideas, creators, change makers, and global partners.

Now that… is Positively Techie!

Apple PD…Easy as 1, 2, 3!

Anyone who knows me, knows I absolutely LOVE Apple products.  I wasn’t always an Apple girl. It all started when I returned to the classroom several years ago.  I had no choice but to use a Mac because that is what our school district used.  All of my computer experience consisted of Microsoft, so it took a while to get used to Pages, Numbers, and Keynote.  However once I did, I would never look back!  In the past 9 years that I have been back to work, Apple has developed amazing products to enhance student productivity and creativity.  They also display a strong commitment to education and supporting students and teachers.  Now, there is even MORE of a reason to love Apple, The Apple Teacher Program.

The Apple Teacher Program  is a program that helps teachers get the most out of Apple products.  Once you sign up with your Apple ID, you have a multitude of resources available to you.  The resources I found the most helpful are the iBooks dedicated to each Apple app.  There is an iBook for each productivity app as well as creative app for both iPad and Mac.

screen-shot-2016-11-13-at-8-58-57-am

What I love about this is you can learn about these products/apps at your own pace.  You can skip over what you already know, re-read what is confusing, or take it one skill at a time.  All while in the comfort of your own home.  After you’ve mastered each product/app , you can take a quick 5 question quiz to earn badges.  Once you pass all 8 quizzes, you get the Apple Teacher 2016 badge that you can proudly display.  Not only are there “Starter Guides” for the above Apple products, there are  many other iBooks that have been written for educators to help YOU learn tips and tricks for other apps you could use in your classroom.

Another amazing FREE PD Apple offers teachers is “First Tuesdays for Teachers“.

screen-shot-2016-11-13-at-9-10-43-am

In select areas, Apple stores offer PD on their apps and products, the first Tuesday of every month.  I attended my first one on November 1st, and it covered Keynote.  A Creative Team member from the Apple Store lead the session.  There were about 10 other educators there and the session lasted for and hour and a half.  The session was hands on and was very informative.  I highly recommend searching for a store near you and registering today!

One of our goals as educators is to inspire our students to become life long learners.  I strongly believe that leading by example is very powerful.  It is easy to get bogged down with school work and home life, but we need to take the time to grow as educators.  We need to take the time to learn new things.  We need to take the time to be a good role model to our students and show them that WE TOO are life long learners.

Now that…Is Positively Techie!


Summer Learning Part 2: Coding with Ozobot Robots

This year our PTO purchased a set of ozobot robots as part of our new weCreate Studio.  I used ozobots in my Innovation Club and couldn’t wait to have the opportunity to have fifteen hours dedicated to using them :))  So, the next part of my day in summer school consisted of two coding classes.  I had a class with students entering 1st grade through 3rd grade and another class with students entering 4th grade through 6th grade.  Both classes had 18 students enrolled as I had 18 ozobots available.

Ozobots are mini robots that follow code from a variety of sources.  I love using ozobots because of their flexibility and differentiated approach to teach coding to students.  With ozobots, you begin by drawing a line on paper and watch the ozobot follow the line.  The next step is to add color codes to the line.  The ozobot reads the code and then follows that code.  Finally, the user logs into ozoblockly.com to write block codes for the ozobot to read.  Within the ozoblockly site, there are several different levels the user can utilize from beginner to advanced.

I used lessons from the ozobot website to guide my instruction.  My goal for the end of the session was to have the students create a maze and then write the code for the ozobot to complete the maze.  Below you can see the schedule I followed.

1st – 3rd Grade

4th – 7th Grade

Day 1 Explore the ozobot Explore the ozobot
Day 2-3 Basic Training Lesson 1 Basic Training Lesson 1
Day 4 Workshop 1 Basic Training Lesson 2
Day 5 Workshop 2 Basic Training Lesson 2 cont.
Day 6 Free Play with ozobot app AND “Draw coding” Free Play with ozobot app
Day 7-10 Ozoblockly Basic Training Lessons Ozoblockly Basic Training Lessons
Day 11 Deasign and draw maze Design and draw maze
Day 12-13 Finalize maze that ozobot can fit through Build maze
Day 14-15 Write the code for maze Write the code for maze


The ozobot website has so many resources that makes using this tool so incredibly easy, even if you have never coded before.  I highly recommend including ozobots in your Stem lab or classroom.  If funds are low, you can always try creating a project on DonorsChoose.org or even check your local library, they might have a set you can check out!

Now that…Is Positively Techie !

How do you use ozobots in your classroom?  I’d love to know!

Summer Learning Part 1: Stop Motion Animation


A Positively Techie School Year

The countdown of days is on the board, students are more chatty than usual, and the scent of a sweaty, almost sixth grader hits you when you walk in the room…

It’s coming quickly to an end.  A school year with my little family of fifth graders.  I have spent more waking hours with these kiddos than my own children and I love them all dearly.  I have learned all about their lives, I know their mannerisms, their little quirks, their strengths and their weaknesses.  I look forward to seeing them each and every day.  It is amazing how much a child grows and changes in ten months.  It’s amazing how educators grow and change in a school year…

The end of the school year means a time to reflect, a time to think about the next little family of students that will be coming my way in the fall.  What worked, what didn’t, what I can do better, what I will try new next year?  The questions, thoughts, and ideas keep swirling in my head.  As much as I don’t want this year to end, I can’t help but think about how I can be a better teacher, learner, facilitator, and leader next year.

The biggest change for me this school year was turning my classroom into a flexible learning space.  It by far was THE BEST idea I had all year!  The positive response from the parents, students, and other staff members was overwhelming. The students tell me how much easier it is for them to learn in my classroom because “they don’t feel confined”, “they are comfortable”, “they can focus on their learning and not on the fact that they are sitting where they don’t want to sit”.  The thing about my classroom is it’s not only about the furniture.  “Flexible” was more of our motto all year.  WE were flexible.  Students had the choice of where to sit any time of day.  They had to make the right choice everyday to ensure they got their work done.  To my amazement, the majority of the time, they made perfect choices for themselves!  I gave them the power to take some control of their learning and they used their power wisely.  Next year, I already have plans to make a few changes and add a few fun pieces of furniture (and hopefully ditch my desk – if I can find it a new home).

I was able to teach all the fifth graders during a designated “tech time”.  I worked with students on projects dedicated to Social Studies, Science, and Language Arts as well as a few techie lessons to build their technology tool kit.  We had Mystery Skypes, wrote blogs, and worked on many projects including a few of my favorites the “Shark Tank” project, a Mother’s Day video, and a digital memory book. Our local Apple Store in Oak Brook, IL. sent out two members of their Creative Team to lead workshops to teach the students about the Apple apps on their iPads. The team came out several times throughout the school year and helped the students create a digital memory book.  This “book” is a memoir of their life from birth through fifth grade.  It includes photos, video, student created background music, and a voice over of the students telling their stories and memories for each year of their life.  These are truly going to be memorable keepsakes for years to come!

Mother’s Day Project

Towards the end of the year I started an Innovation Club and began the creation of the weCreate Lab at our school.  I met with K-2 graders and 3-4 graders to introduce them to technology tools that will be available to them next year in the weCreate Lab.  My favorite item is the ozobot robots.  I LOVE how ANYONE who can draw a line can make the robot move from one place to another.  I am also loving the fact that students build on their expertise and eventually code on the computer to lead their robot from one place to the next.  I spent a few sessions with Snap Circuits and littleBits.  The students easily caught on and understood how everyday items get their power through circuits.  I gave students challenges to make the light dim, make the fan turn on, and turn a light different colors.  It was rewarding to see how the students, even Kindergartners, kept trying and didn’t give up until they figured it out.  The excitement and joy they showed when they finally met the challenge was awesome!  The last couple of sessions we will be exploring the Makey Makey Kits.  Students this year got a taste of the new technology tools available to them, but next year, we will really be able to dig in and go through the whole design thinking process.

Subscribe to John Spencer on You Tube!

I want my students to be risk takers, therefore I hold myself to that same standard. Each year I try new things. Either I expand on what I’m already doing or I try something completely new. A couple of new ideas didn’t work out quite as I planned.  This year I tried The Global Read Aloud for the first time.  The Global Read Aloud is a global phenomenon created by the amazing Pernille Ripp @pernilleripp.   Books are chosen each year and classrooms around the globe read the same book and connect to discuss the book through Edmodo, blogging, Skype, etc.  I set up 2 classes for my class to connect with and we actually did connect with one class.  It was not easy to get all of the assigned chapters read each week and the class that we actually did connect with didn’t participate much.  I love the idea behind The Global Read Aloud, but I also feel that in order for it to work both classes need to really commit to participating fully.

Next year I want to improve on so many things.  I want to schedule more Mystery Skypes.  After the first Mystery Skype I ever did, I never wanted to give another map worksheet.  The amount of authentic geography learning that happens during a Mystery Skype is astounding!  Everything I know and have used on Mystery Skype I got from another amazing educator Paul Solarz @PaulSolarz.  I planned on participating in blogging challenges with my students, but I didn’t.  That will definitely be on my goal sheet for next year.  I also want to learn and use Google Classroom to it’s fullest potential.  It was a helpful tool to send out and collect assignments however I know it could be used for so much more!  I follow Alice Keeler on Twitter @alicekeeler.  She is THE ONE to turn to if you want to know anything Google.   I will be researching all things Google as well as work on getting my Google Certified Educator Levels 1 and 2 this summer.

Screen Shot 2016-05-15 at 8.31.41 PM

Of course I have some new things up my sleeve that I can’t wait to try next year. I am super excited for Breakout EDU to arrive.  This is a game that promotes collaboration, teamwork, problem solving, the list goes on.  The goal is to unlock the box in a specific amount of time.  There are several different scenarios with clues to a mystery that needs to be solved.  You work together to solve the mysteries and unlock the box.  I want to start the year off with a Breakout EDU game at one of our Institute Days.  This way, the staff can see first hand how students can build bonds through the collaboration and teamwork involved in opening the box.  A PERFECT back to school activity!!

I am looking forward to connecting Common Core State Standards and Next Generation Science Standards to activities in the weCreate Lab and designing some novel engineering activities. I also signed up to receive the Idea Box  from the James Dyson Foundation.  I am excited to learn more about Hyperdocs and create some for the upcoming school year.  I want to tip my toe into gamification and figure out what it is all about. I am sure there are things I don’t even know I want to learn about.  The summer days are a great time to learn more about amazing ways to integrate technology into the classroom.   How are YOU growing as an educator this summer?  Is there something you want to learn more about?

I am looking forward to spending time with my “real” family, sleeping a little bit later in the morning, lounging by the pool, and going for long, quiet walks.  But I will also be thinking, designing, creating, learning, and doing everything I can to be…well – better.  

Now that… Is Positively Techie!

Innovators Wanted!

One of my goals for the new year is to create as many opportunities as possible for my students to be curious, to be imaginative, to become planners, and collaborative  risk takers who create.  In other words, I want my students to become innovative!

“Shark Tank” Unit

Our  fifth grade team created a “Shark Tank” Unit which is perfect for creating the environment to make innovation happen in my classroom.  Students will research an invention that is valuable to their everyday life.  They will find out:

      1. Inventor
      2. Invention
      3. Problem invention solved
      4. The process from idea to production
      5. Timeline of dates – i.e.. Idea, patent, production, first sale, etc..
      6. Struggles/roadblocks inventor encountered
      7. Cost/Profit/Financial info

Then, the students will brainstorm an everyday problem they have and think of ways to solve the problem.  Students will present a variety of information:

      1. Invention name
      2. The problem it solves
      3. Share a visual/ graphic aide showing what it looks like
      4. A description of how it works
      5. Materials used/needed, “starting plan” on how it will be built/assembled
      6. Itemized cost of materials per unit/Total Cost to build/Selling price per unit/Profit CAN include marketing material (brochures, infomercial, packaging, etc…)

The presentations will be given “Shark Tank” style and a few students from each class will be chosen (invested in) to work with other students to build their invention.   Check back in March to see the completed inventions!


Innovation Club & Lab

Not only do I want to create this opportunity for my own students, but I want to create it  for other students at my school too.  I am hearing about more and more schools with “maker spaces” and was inspired and excited to get one started at my school too!  I was extremely fortunate to have our PTO provide the funds to purchase materials for an “Innovation Club & Lab” at my school 🙂  I will be sponsoring an after school club and the materials will be available for teachers to “check out” so they can use them in their own classroom.  There are so many materials out there, it was really hard to choose the best ones to meet the school’s needs.  I wanted to choose materials that would not only create an environment where students could be innovative, but were also teacher friendly, so  teachers would feel comfortable to use the materials too.

  1. Makey Makey Kits download 2
    Use the supplied circuit board, alligator clips and a computer to turn ANYTHING into a keyboard.  Beginners to advanced creators can have fun while typing a letter to creating an elaborate device.
  2. LittleBits           images 2
    Magnetic bits fit together to create a circuit.  Follow the directions to start a fan, turn on a light, or create your own invention.
  3. ozobot             download (1) 2
    A tiny robot that teaches robotics and programming.  Students can program using either a drawn color code or a more advanced block-based code.  This robot can play games, dance, and much more!
  4. Snap Circuits    download (2) 2
    Follow the color coded manual to snap together circuits to create a variety if electrical items SAFELY or create your own.
  5. JustStand V2       Screen_Shot_2013-09-06_at_10.57.28_PM 2
    This iPad stand can be for stop motion and video creation. Can also be used as a document camera – bonus 🙂

What I LOVE about all of these products is that they can be differentiated to meet the varying level of each student.  All students from K-H.S. can use these products and be challenged, the product grows with the student’s level of mastery, imagination and creativity.

My dream is to eventually have a full “Innovation Lab” at my school, one similar to Creative Learning Systems Smart Labs.    I know it will take time and I am confident it will be the norm in the future.  I will continue to take small steps until I get to where I believe we need to be in education.  If you are interested in taking steps with me, comment below and we can take the journey together!

Now that… Is Positively Techie!

Feature Image credit

A Few of My Favorite “Techie” Things

There are so many websites and apps these days, it is hard to keep up with them all!  There are some that come and go quickly and others that stick around for the long haul.  My favorite type of tech tools are ones that are used for creation purposes, easy to use, and can easily be shared globally.  I have a few that I use consistently each year because they have all of those qualities.

The first tool is Storybird.  Storybird is a FREE website where students choose artwork for the pages of a book and then write a story based on those pictures.  Here is my Storybird book called Dreams.  As you can see a simple story can have a big message.  The creativity, critical thinking, decision making, and writing are all a part of the process to create a thought provoking story.  Adding on top of that, the opportunity to share their story with the world, a real live audience, takes it to the next level.  I set the stories as public and I have my students share their stories on their blog.  One more thing I LOVE – parents can purchase the book as a hardcover or softcover.  Not only is this tool amazing for writing instruction, students enjoy reading each other’s books – along with the hundreds of thousands of books written by children and authors around the world!  So EXCITING 🙂

9090301512_a0882be894_b

Speaking of reading…another website I find my students engaged in often is Newsela.  Newsela is a website FILLED with non-fiction articles.  The articles can be changed to several different Lexiles so every article can be enjoyed by your struggling reader to your strongest reader with the click of a button.  Teachers can assign specific articles and levels to their students or students can choose on their own what they’d like to read.   Newsela also offers text marking tools, quizzes at the end of articles, and open-ended questions for students to answer.  Articles are categorized by subjects such as “Money”, “Kids”, “Art”, and “Science” to name a few.  Newsela has recently updated their site with Text Sets.  Text Sets are a group of articles related to a specific topic.  You can create your own Text Set for a topic you are covering in your classroom or use someone else’s Text Set that has already been created (and tweak it to make it perfect for your classroom needs).  I have used Newsela in two ways this school year.  Each week students are required to read an article of their choice.  Then students create a Google Slide with the title of the article, four detailed facts (as bullets) that support the main idea, and their opinion or thoughts on the article.  Students have also written a blog post (bitly.com/5Gblog) about an article they read and commented on each other’s posts.  I plan on assigning more of those posts in the future.

NewselaLogo

News-o-matic is an app that has non-fiction news stories written by children for children.  We were fortunate enough to have a trial period at the end of last year with this app and my students LOVED it!  They loved reading the stories so much, that several of them had their parents buy the app for their personal devices at home.  The stories include fun visuals, video clips, maps showing where the story takes place, puzzles and much more!  Unfortunately, it is an expensive app so we don’t have it this year. However, it is definitely worth looking into for your classroom!

cropped-Newsomatic_

The last tool is a fun way for students to create a summary of ANYTHING…Tellagami is an app that allows your students to choose a background, create a personalized Gami, and either type in what the Gami says or record themselves saying what they want their Gami to say.  Once the 30 second video is created, students can email it to themselves and use the link to put their video into their blog post.  In the past, students have used this tool to give a quick summary of an object they took a picture of and use it as the background.  For example, a summary of a book, a description of a plant cell, a historical photo, or an explanation of a piece of art they created in art class.

tellagami

There are so many wonderful tech tools to enhance instruction in the classroom and unleash your student’s creativity out into the world.  Allowing yourself the time to explore new tools and take the risk of trying something new and unfamiliar in your classroom can lead you to find some of YOUR favorite “techie” things.  So go ahead….Give one of these a try!

Now that is Positively Techie 😉